My experiences of managing a Cisco switch with Puppet
One recent pet gripe of mine has been having to add a new VLAN into our datacenter for our vSphere platform. Not that I trust my DCs switches with puppet just yet, this is a proof of concept post about how we could be using puppet to centrally manage this configuration and push it out across our DC.
Before
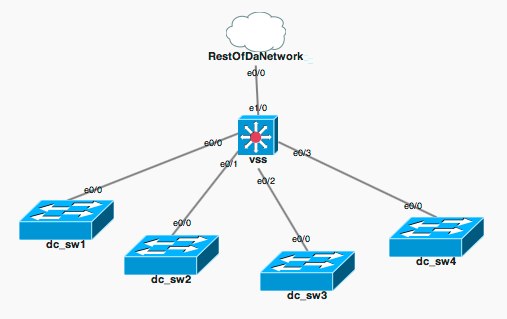
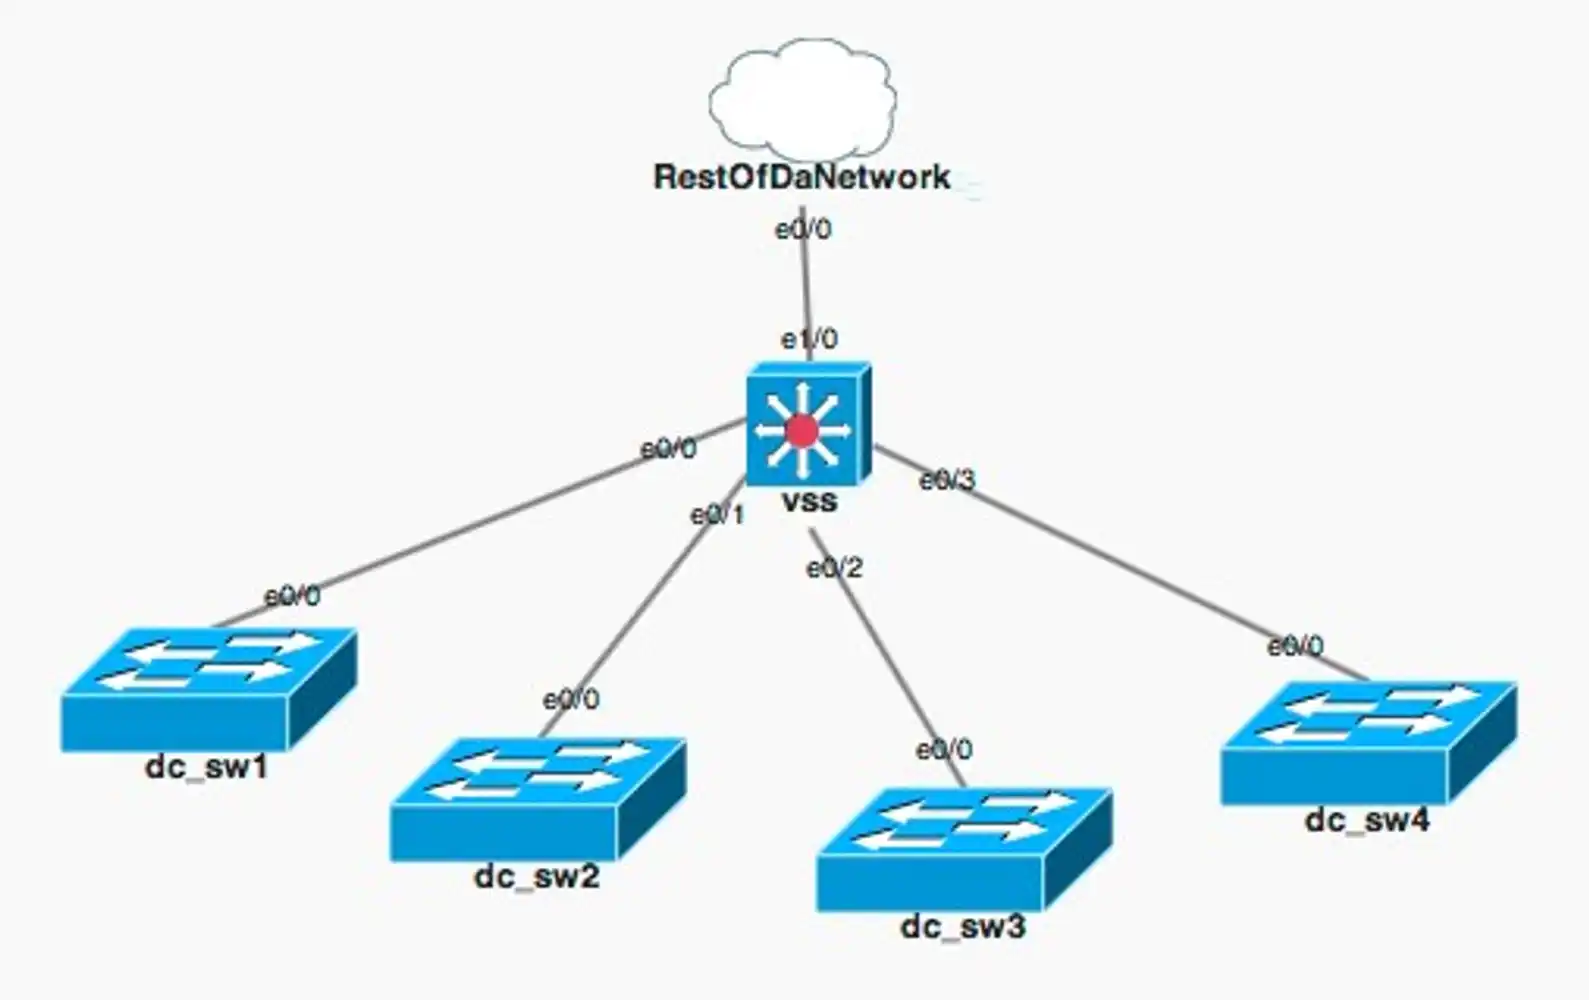
We’ve got a pretty basic topology going on in our DC, it’s just a VSS with the other switches pretty much being nothing more but layer 2 for the most part. The dot1q trunk back to the VSS carries all VLANs from our end of row switches. When we add a new vlan in the DC to trunk to the ESX machines, we would add the VLAN in all the DC switches (not running VTP) then add the vlan to the trunk port on each port patched to the ESX hosts. (we’re not using any link aggregation to the ports connected to the same ESX host, the ESX hosts themselves have their own load balancing method.. If you know any for/against doing it like this please comment and let me know)
Setting up the Puppet lab
Introduced in Puppet 2.7 is network device management. This more or less is an expect script to manage interfaces and vlans on IOS devices. For this lab, we will be using cisco IOU with the following topology

Setting up the Devices
Ideally, you would have a few puppet nodes that manage a few devices each to spread out the load, for the purposes of this exercise, I created a single vm running Centos6 with both puppet-server and puppet installed. For this machine to manage the switches, I added the following into the device.conf file
[root@localhost ~]# cat /etc/puppet/device.conf
[dc_sw1]
type cisco
url telnet://puppet:cisco@10.0.1.131/
[dc_sw2]
type cisco
url telnet://puppet:cisco@10.0.1.132/
[dc_sw3]
type cisco
url telnet://puppet:cisco@10.0.1.133/
[dc_sw4]
type cisco
url telnet://puppet:cisco@10.0.1.134/
Signing the devices
To update the devices, you have to run puppet device. The first time you run it, a certificate will be created that needs to be signed on the puppet master.
[root@localhost ~]# puppet device --verbose
info: starting applying configuration to dc_sw4 at telnet://puppet:cisco@10.0.1.134/
info: Creating a new SSL key for dc_sw4
warning: peer certificate won't be verified in this SSL session
info: Caching certificate for ca
warning: peer certificate won't be verified in this SSL session
warning: peer certificate won't be verified in this SSL session
info: Creating a new SSL certificate request for dc_sw4
info: Certificate Request fingerprint (md5): E8:A6:35:9D:BF:CE:3D:BC:E0:E4:C2:5B:00:CE:9F:DB
warning: peer certificate won't be verified in this SSL session
warning: peer certificate won't be verified in this SSL session
warning: peer certificate won't be verified in this SSL session
so we’ll need to sign our devices
[root@localhost ~]# puppetca --sign dc_sw4
notice: Signed certificate request for dc_sw4
notice: Removing file Puppet::SSL::CertificateRequest dc_sw4 at '/var/lib/puppet/ssl/ca/requests/dc_sw4.pem'
Setting up the switches for Puppet
If you look up to the device configuration file, we need to create a local user for puppet to log into the switch (remember, it acts much like an expect script)
username puppet privilege 15 password 0 cisco
line vty 0 4
privilege level 15
password cisco
login local
transport input all
!
The Configuration
so with no more ado, we can easily simply abstract the behaviour of these ports using puppet syntax 🙂
define esxport( $port ){

interface {
"${port}":
mode => trunk,
duplex => full,
description => "ESX Host",
allowed_trunk_vlans => "3,4,5,8,9"
}

}

node "dc_sw1" {

esxport { 'e0/2': port => 'Ethernet0/2' }
esxport { 'e0/3': port => 'Ethernet0/3' }

}

node "dc_sw2" {

esxport { 'e1/0': port => 'Ethernet1/0' }
esxport { 'e1/1': port => 'Ethernet1/1' }
esxport { 'e1/2': port => 'Ethernet1/2' }
esxport { 'e1/3': port => 'Ethernet1/3' }

}
The Ugly
A lot of the states don’t yet seem to be supported by this module. This means even the default trunk mode of dynamic desirable will cause issues when Puppet is pulling device information and you’ll have to manually specify “switchport trunk encapsulation dot1q” and “switchport mode access” before setting puppet free on the devices.
Results
[root@localhost ~]# puppet device --verbose
info: starting applying configuration to dc_sw4 at telnet://puppet:cisco@10.0.1.134/
info: Caching catalog for dc_sw4
info: Applying configuration version '1355007108'
notice: Finished catalog run in 0.20 seconds
info: starting applying configuration to dc_sw3 at telnet://puppet:cisco@10.0.1.133/
info: Caching catalog for dc_sw3
info: Applying configuration version '1355007108'
notice: Finished catalog run in 0.21 seconds
info: starting applying configuration to dc_sw2 at telnet://puppet:cisco@10.0.1.132/
info: Caching catalog for dc_sw2
info: Applying configuration version '1355007108'
notice: /Stage[main]//Node[dc_sw2]/Esxport[e1/1]/Interface[Ethernet1/1]/description: defined 'description' as 'ESX Host'
notice: /Stage[main]//Node[dc_sw2]/Esxport[e1/1]/Interface[Ethernet1/1]/duplex: duplex changed 'auto' to 'full'
notice: /Stage[main]//Node[dc_sw2]/Esxport[e1/1]/Interface[Ethernet1/1]/mode: mode changed 'access' to 'trunk'
notice: /Stage[main]//Node[dc_sw2]/Esxport[e1/1]/Interface[Ethernet1/1]/allowed_trunk_vlans: defined 'allowed_trunk_vlans' as '3,4,5,8,9'
notice: /Stage[main]//Node[dc_sw2]/Esxport[e1/3]/Interface[Ethernet1/3]/description: defined 'description' as 'ESX Host'
notice: /Stage[main]//Node[dc_sw2]/Esxport[e1/3]/Interface[Ethernet1/3]/duplex: duplex changed 'auto' to 'full'
notice: /Stage[main]//Node[dc_sw2]/Esxport[e1/3]/Interface[Ethernet1/3]/mode: mode changed 'access' to 'trunk'
notice: /Stage[main]//Node[dc_sw2]/Esxport[e1/3]/Interface[Ethernet1/3]/allowed_trunk_vlans: defined 'allowed_trunk_vlans' as '3,4,5,8,9'
notice: /Stage[main]//Node[dc_sw2]/Esxport[e1/2]/Interface[Ethernet1/2]/description: defined 'description' as 'ESX Host'
notice: /Stage[main]//Node[dc_sw2]/Esxport[e1/2]/Interface[Ethernet1/2]/duplex: duplex changed 'auto' to 'full'
notice: /Stage[main]//Node[dc_sw2]/Esxport[e1/2]/Interface[Ethernet1/2]/mode: mode changed 'access' to 'trunk'
notice: /Stage[main]//Node[dc_sw2]/Esxport[e1/2]/Interface[Ethernet1/2]/allowed_trunk_vlans: defined 'allowed_trunk_vlans' as '3,4,5,8,9'
notice: /Stage[main]//Node[dc_sw2]/Esxport[e1/0]/Interface[Ethernet1/0]/description: defined 'description' as 'ESX Host'
notice: /Stage[main]//Node[dc_sw2]/Esxport[e1/0]/Interface[Ethernet1/0]/duplex: duplex changed 'auto' to 'full'
notice: /Stage[main]//Node[dc_sw2]/Esxport[e1/0]/Interface[Ethernet1/0]/mode: mode changed 'access' to 'trunk'
notice: /Stage[main]//Node[dc_sw2]/Esxport[e1/0]/Interface[Ethernet1/0]/allowed_trunk_vlans: defined 'allowed_trunk_vlans' as '3,4,5,8,9'
notice: Finished catalog run in 14.22 seconds
my $0.02
I must say, I’m very disappointed in this module so far. It shows great promise and makes a once tedious task relatively effortless to manage, however with the time invested to find out what is and what is not supported, I think it’s far too early to invest in such a solution. The idea of setting something like an expect script loose on my kit also worries me. It’s much better to have an API or a promise that the input/output the expect script uses won’t change in a future release then do something unexpected (pun intended there.)
I guess if we were using an OS like Junos we could have created apply-groups like this to abstract the configuration in much the same manner, at least down to the switch level. Very interesting for a new take on managing these things though
EDIT:
I’ve been thinking about this a lot since I posted it. I think I was too harsh on the tool. It seems even Cisco’s own tools work by ssh’ing into the box to make their changes.. while not ideal, for these old IOS devices around, it seems to be the accepted thing to do. It’s exciting times ahead in this space though, I can feel it!
